DATASCI 350 - Data Science Computing

Lecture 07 - More Git Commands, CLI and Git Practice

Danilo Freire

Department of Data and Decision Sciences
Emory University

Hello, everyone! 😊

Recap and lecture overview 📚

Recap of our last lecture

In our last class, we covered

  • How to push and pull changes to and from remote repositories
  • Using .gitignore to avoid tracking certain files
  • Creating and managing branches with git branch and git checkout
  • The difference between clone and fork repositories
  • Resolving conflicts when multiple people change the same code
  • Going back to specific commits with git checkout and git reset
  • Workflow for merging branches back to master/main
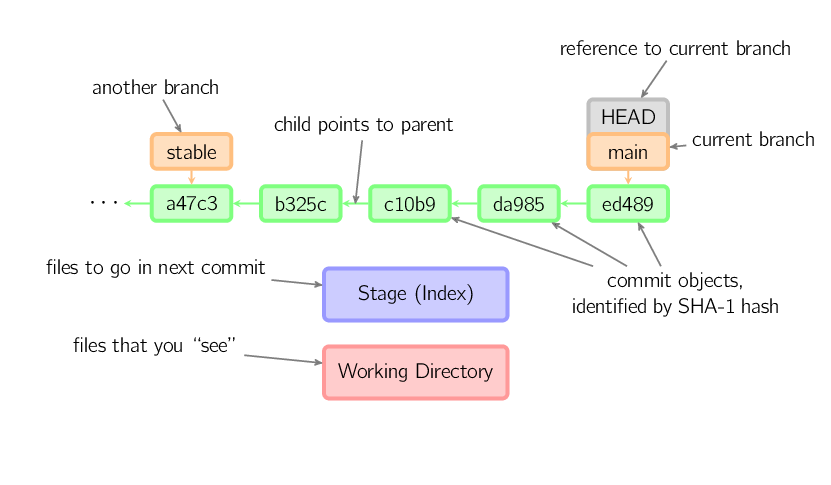
Source: Lodato (2010)

Today’s lecture

Today we will cover:

  • Understanding changes with git diff
  • Amending commits with git commit --amend
  • Cherry-picking commits with, well, git cherry-pick 😅
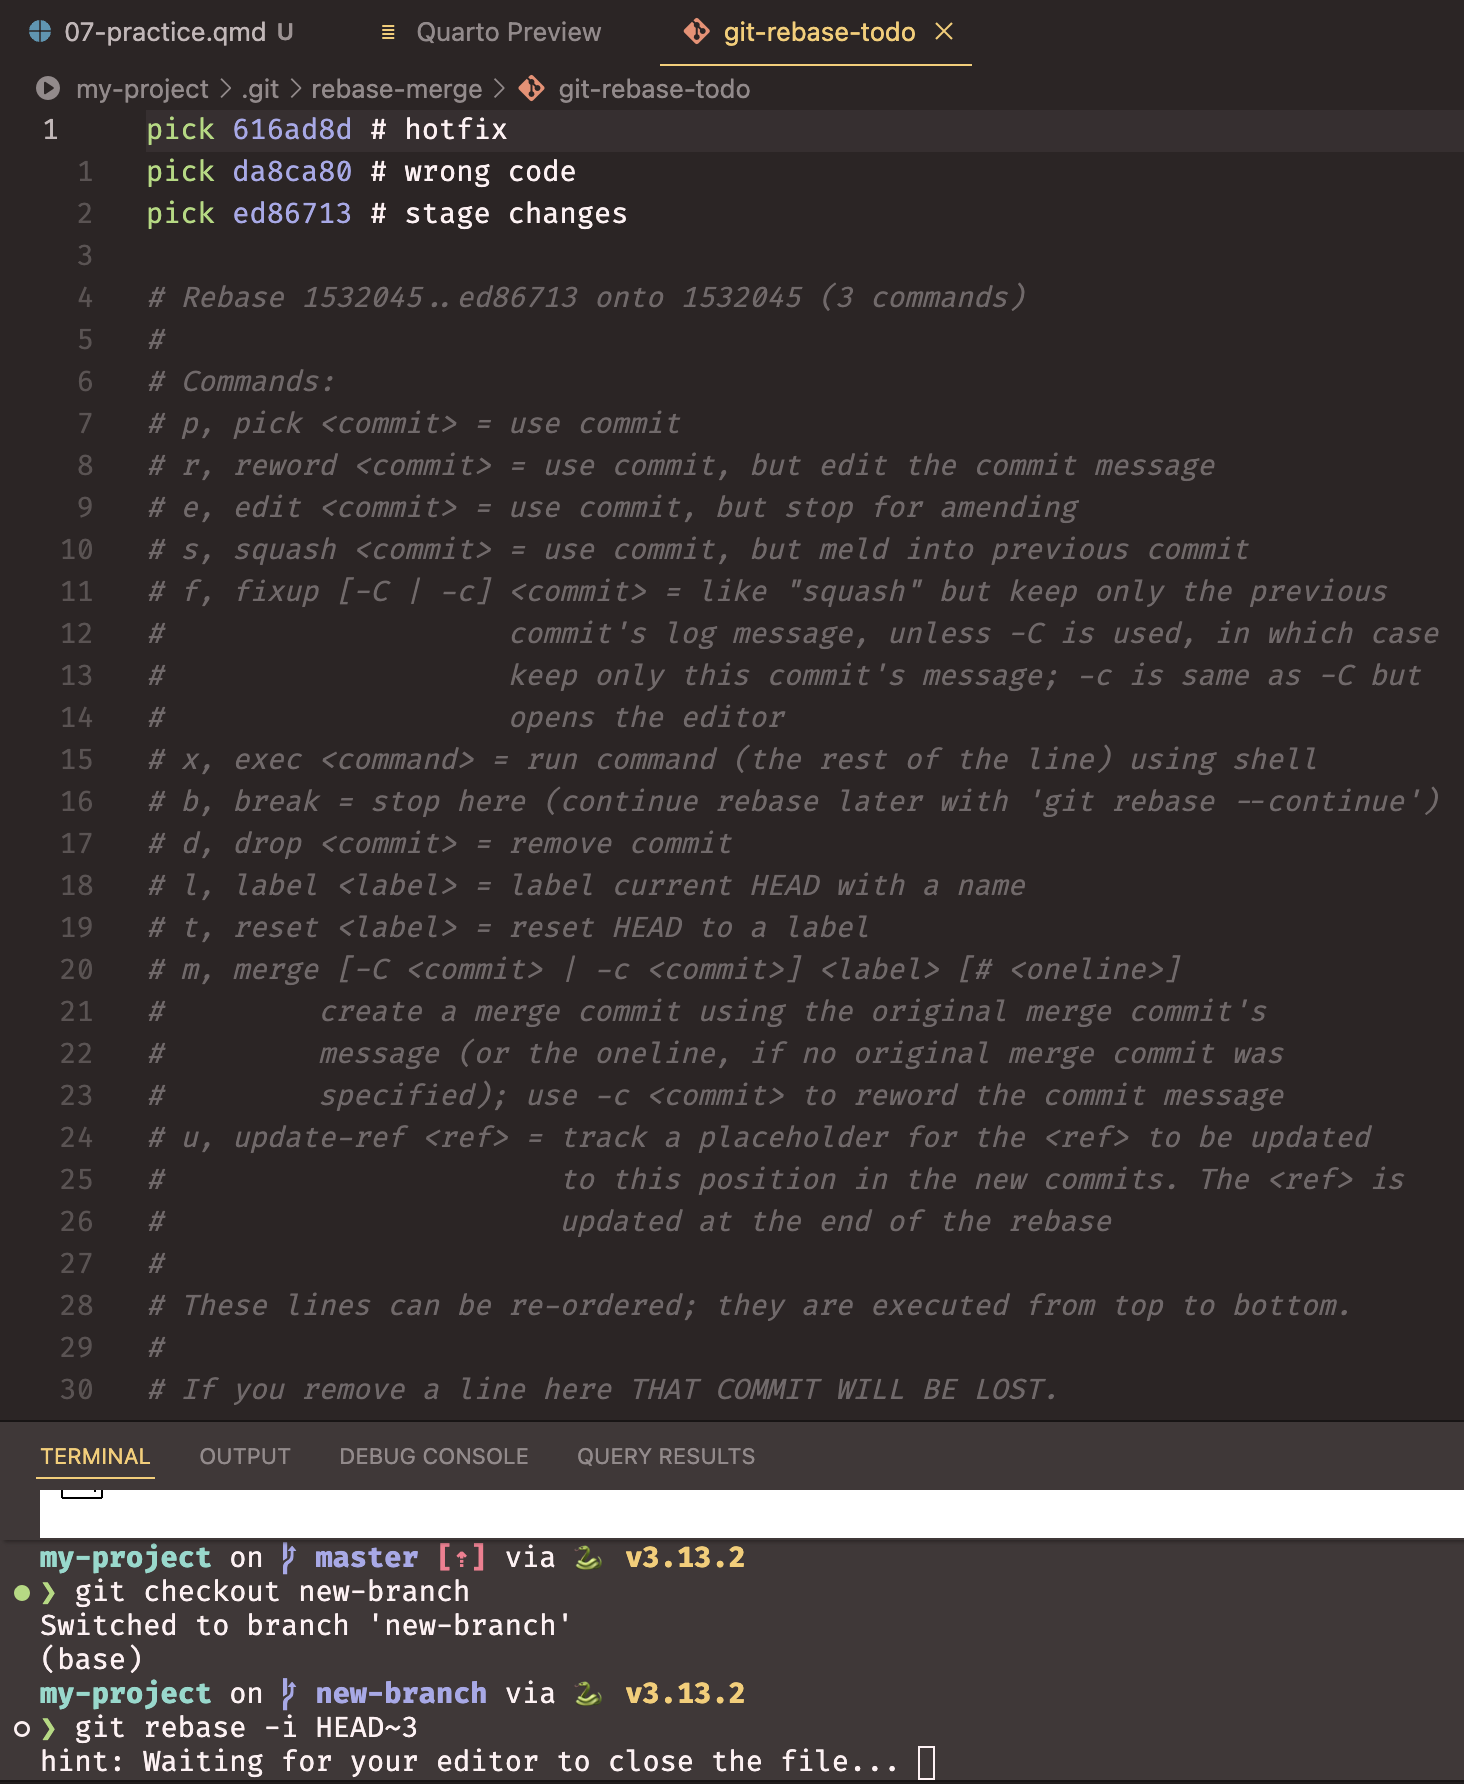
  • Understanding git rebase and its uses
  • Saving work temporarily with git stash
  • Installing and setting up GitHub CLI
  • GitHub CLI repository management
  • Mock-up quiz!

Understanding changes with git diff 🔍

What is git diff?

  • git diff shows what has changed, line by line
  • It compares your working directory, the staging area, commits, or branches
  • Read it before every commit. It is the cheapest way to catch a mistake
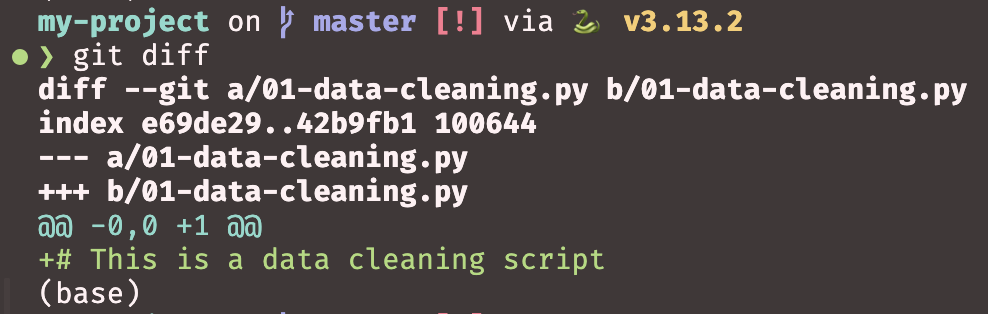
  • Let’s make a change in my-project and look at it
echo "# This is a data cleaning script" >> ./01-data-cleaning.py
git diff

Reading the output:

  • a/ is the old version, b/ is the new one
  • @@ -0,0 +1 @@ gives the line numbers: none before, one line now
  • + marks an added line, - a deleted one

Common git diff commands

Basic diff commands:

  • git diff: shows unstaged changes in working directory
  • git diff --staged: shows staged changes ready to commit
  • git diff HEAD: shows all changes since last commit
  • git diff --name-only: shows only filenames that changed

Comparing commits:

  • git diff commit1..commit2: compares two specific commits
  • git diff branch1..branch2: compares two branches
  • git diff --stat: shows summary of changes (files modified, insertions, deletions)
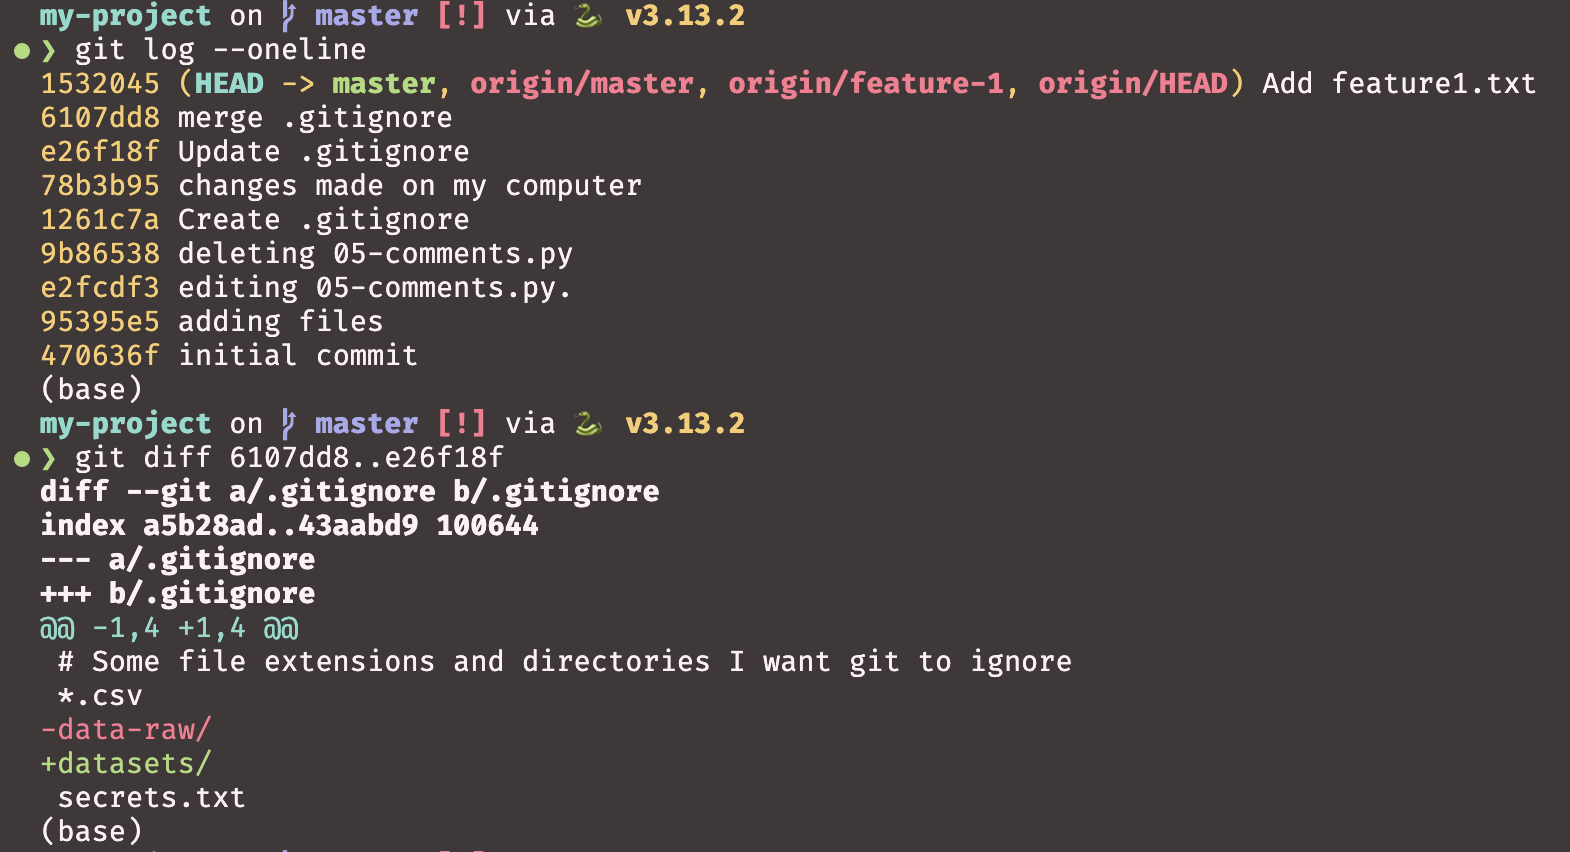
  • @@ -1,4 +1,4 @@ means that in the original file, lines 1 to 4 were present, and in the new file, lines 1 to 4 are also present, but with some changes

Amending and undoing commits

What is git commit --amend?

  • git commit --amend rewrites your last commit
  • Use it when you mistyped the message, or forgot to add a file
  • Whatever is staged gets folded into the previous commit
  • Only amend commits you have not pushed. Rewriting shared history causes trouble for everyone else
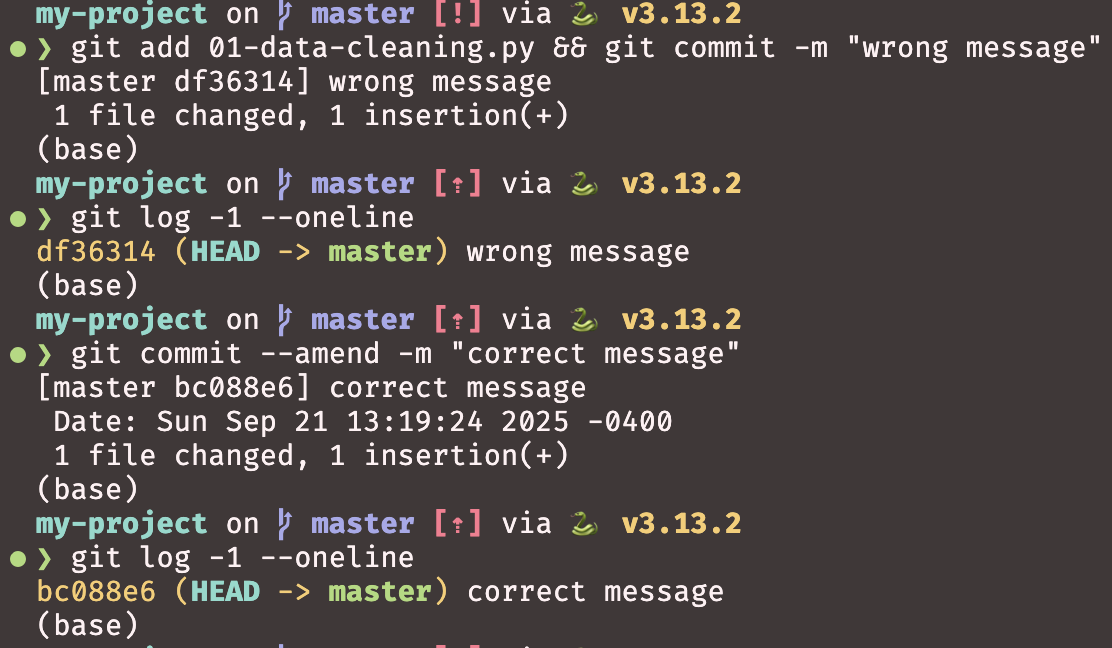
How to amend commits

Amending the commit message:

git commit --amend -m "New commit message"

Adding forgotten files:

git add forgotten-file.txt
git commit --amend --no-edit

Both together:

git add new-file.txt
git commit --amend -m "Updated commit message"

Important rules:

  • Only amend local commits
  • Never amend commits that have been pushed to a shared repository
  • If you need to modify pushed commits, use git revert instead
  • Always communicate with your team before amending shared history

Undoing commits with git reset

  • If you made a mistake, git allows you to undo commits
  • git reset can move the HEAD pointer to a previous commit
  • --soft keeps your changes staged
  • --mixed (the default) keeps them, but unstaged
  • --hard throws them away entirely
  • Use with caution too! Hard reset will delete uncommitted changes
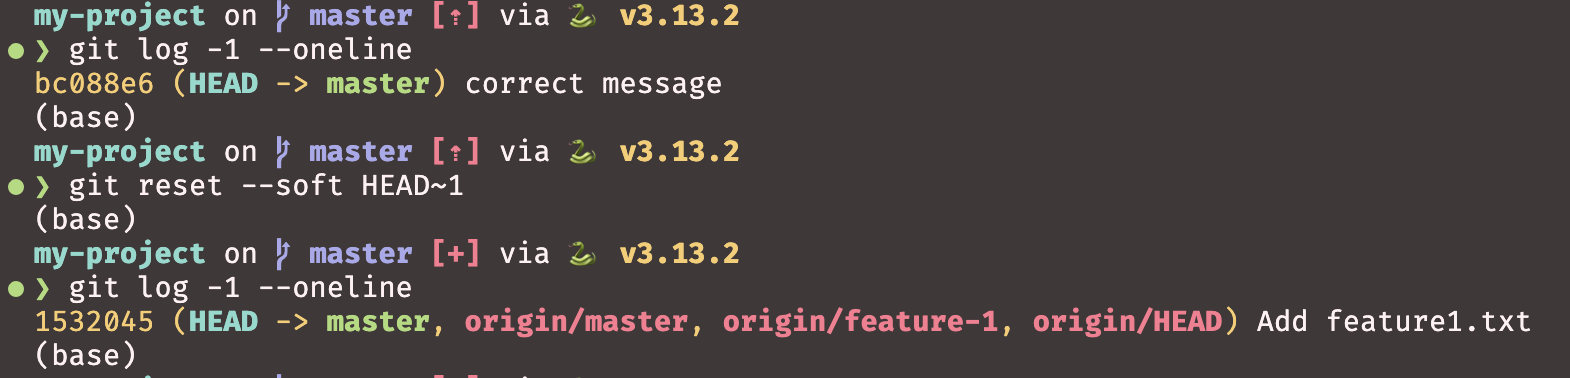
Undo last commit but keep changes:

git reset --soft HEAD~1

Undo last commit and discard changes:

git reset --hard HEAD~1
  • You can undo as many commits as needed by changing the number after HEAD~, such as HEAD~2 for the last two commits

Cherry-picking commits

What is git cherry-pick?

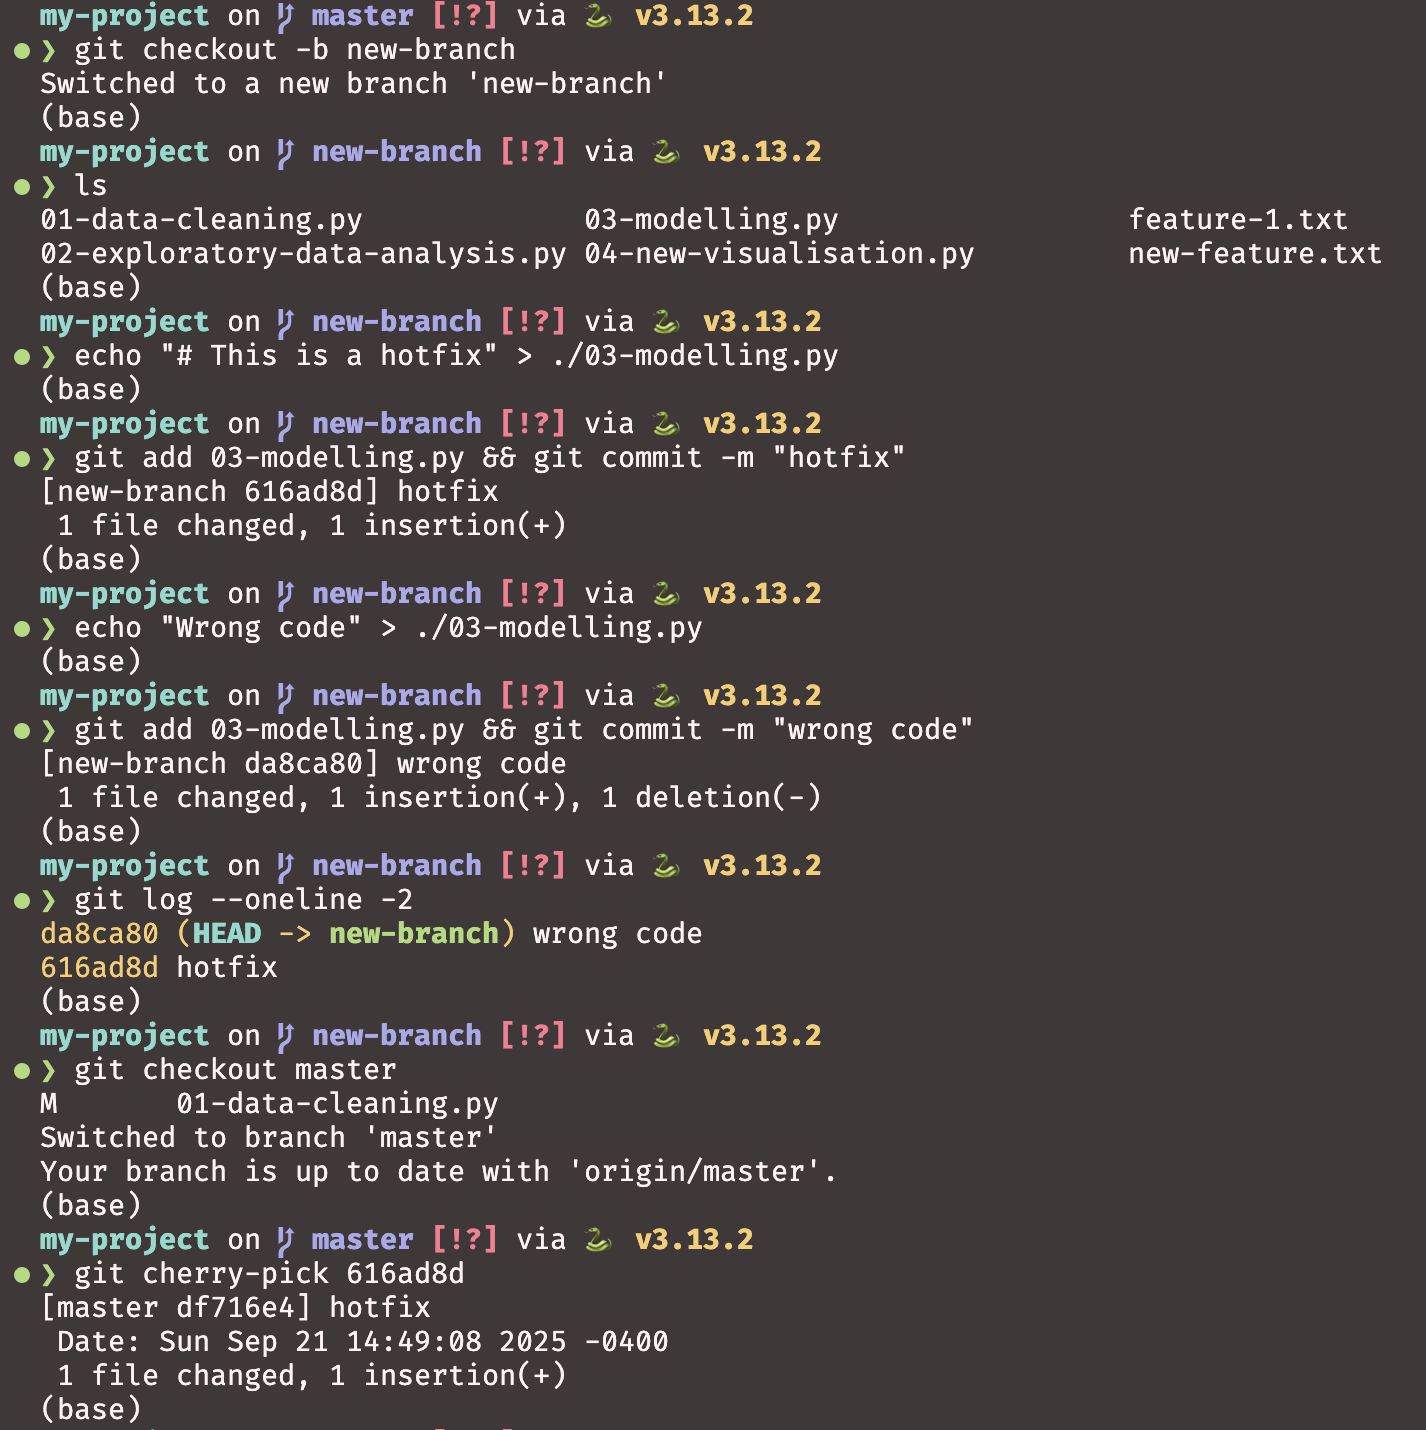
  • git cherry-pick allows you to pick specific commits from one branch and apply them to another
  • Useful when you want to apply a bug fix or feature from one branch to another
  • Each commit is applied individually with its own commit message
  • Can be used to backport changes to older versions
  • Creates new commits rather than modifying existing ones

Using git cherry-pick

Basic cherry-pick:

# Cherry-pick a single commit
git cherry-pick abc1234

# Cherry-pick multiple commits
git cherry-pick abc1234 def5678

# Cherry-pick a range of commits
git cherry-pick abc1234..def5678

After cherry-picking:

  • The commit is applied to your current branch
  • It creates a new commit with the same changes
  • Original commit history is preserved

Handling conflicts:

# If conflicts occur during cherry-pick
git cherry-pick --continue  # After resolving conflicts
git cherry-pick --abort     # Cancel the cherry-pick
git cherry-pick --skip      # Skip the current commit

Common use cases:

  • Applying hotfixes to multiple branches
  • Backporting features to release branches
  • Moving specific commits between branches

Understanding git rebase

Understanding git rebase

  • git rebase allows you to move or combine commits to a new base commit
  • Changes the commit history by replaying commits on top of another base
  • Creates a linear, clean commit history
  • Useful for keeping feature branches up to date with main branch
  • Rewrites commit history - avoid using it on shared or public branches!

Types of rebasing

Interactive rebase:

# Interactive rebase of last 3 commits
git rebase -i HEAD~3

# Interactive rebase to specific commit
git rebase -i abc1234

Rebase onto another branch:

# Rebase current branch onto main
git rebase main

# Rebase feature branch onto main
git checkout feature-branch
git rebase main

During interactive rebase you can:

  • pick: use the commit as-is
  • reword: change the commit message
  • edit: modify the commit contents
  • squash: combine with the previous commit
  • drop: remove the commit entirely
  • To reorder commits, move the lines themselves

Saving work with git stash

What is git stash?

  • git stash puts your uncommitted changes aside, leaving a clean working directory
  • Think of it as a clipboard for work in progress
  • Stashes pile up in a stack, so the last one you saved is the first one back

Use it when:

  • An urgent fix arrives and you are mid-way through something else
  • You want to pull but have local changes in the way
  • You are experimenting and want to park the experiment
  • You started work on the wrong branch
# You're working on a feature
echo "new feature code" >> feature.py

# Suddenly need to switch branches
git stash

# Your working directory is now clean!
git checkout main
# Do your hotfix work...

# Return to your feature branch
git checkout feature-branch
git stash pop  # Restore your changes

Basic git stash commands

Saving and restoring stashes:

# Stash current changes (tracked files only)
git stash

# Stash with a descriptive message
git stash push -m "WIP: adding user authentication"

# Stash including untracked files
git stash -u

# Stash including untracked and ignored files
git stash -a

# Restore most recent stash and remove from stack
git stash pop

# Restore most recent stash but keep in stack
git stash apply

Managing multiple stashes:

# List all stashes
git stash list

# Apply a specific stash
git stash apply stash@{2}

# Drop a specific stash
git stash drop stash@{1}

# Clear all stashes (use with caution!)
git stash clear

# Show changes in most recent stash
git stash show

# Show changes in stash with diff
git stash show -p stash@{0}

Moving changes to another branch with git stash

A very common scenario:

You’ve been coding away, only to realise you’re on the wrong branch! 😱

git stash makes it easy to move your uncommitted changes to the correct branch:

# You're on main but should be on feature-x
# First, stash your changes
git stash push -m "Move to feature-x branch"

# Switch to the correct branch
git checkout feature-x

# Apply your stashed changes
git stash pop

This technique works for both tracked and untracked files (use git stash -u for untracked).

Creating a new branch from stash:

If the branch doesn’t exist yet, you can create it directly from the stash:

# Stash your current work
git stash

# Create new branch with stashed changes
git stash branch new-feature-branch

This command:

  • Creates a new branch from where you stashed
  • Checks out the new branch
  • Applies the stash
  • Drops the stash if applied successfully

Pro tip: This is the safest way to recover stashed work if you’re unsure about conflicts!

GitHub CLI - Installation 🖥️

GitHub in the terminal

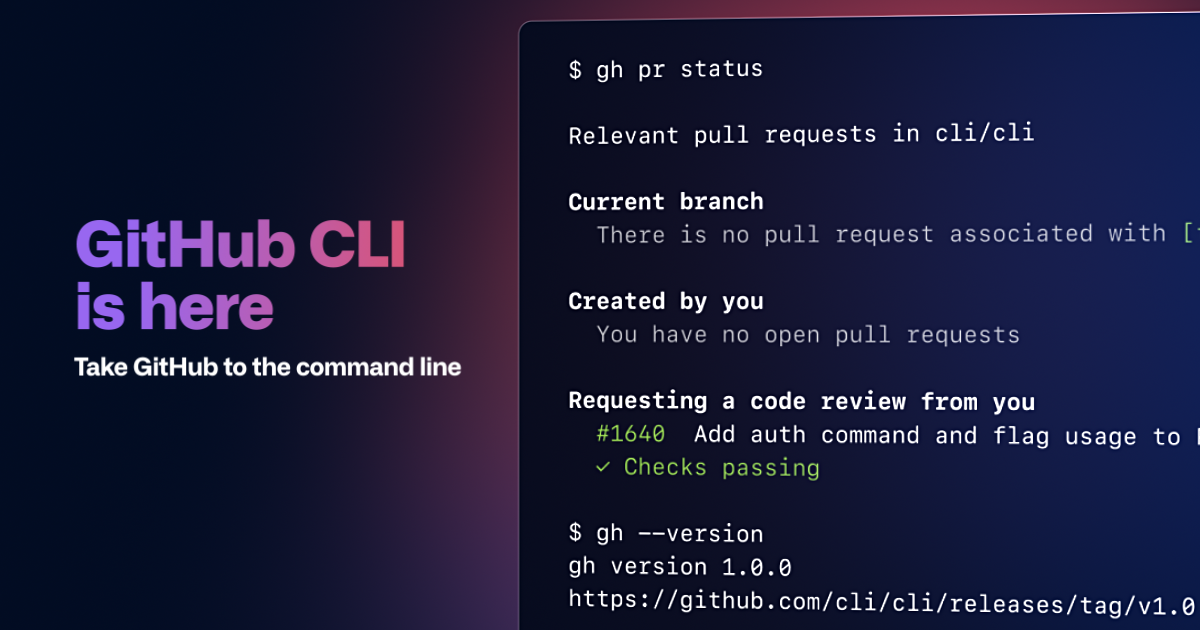
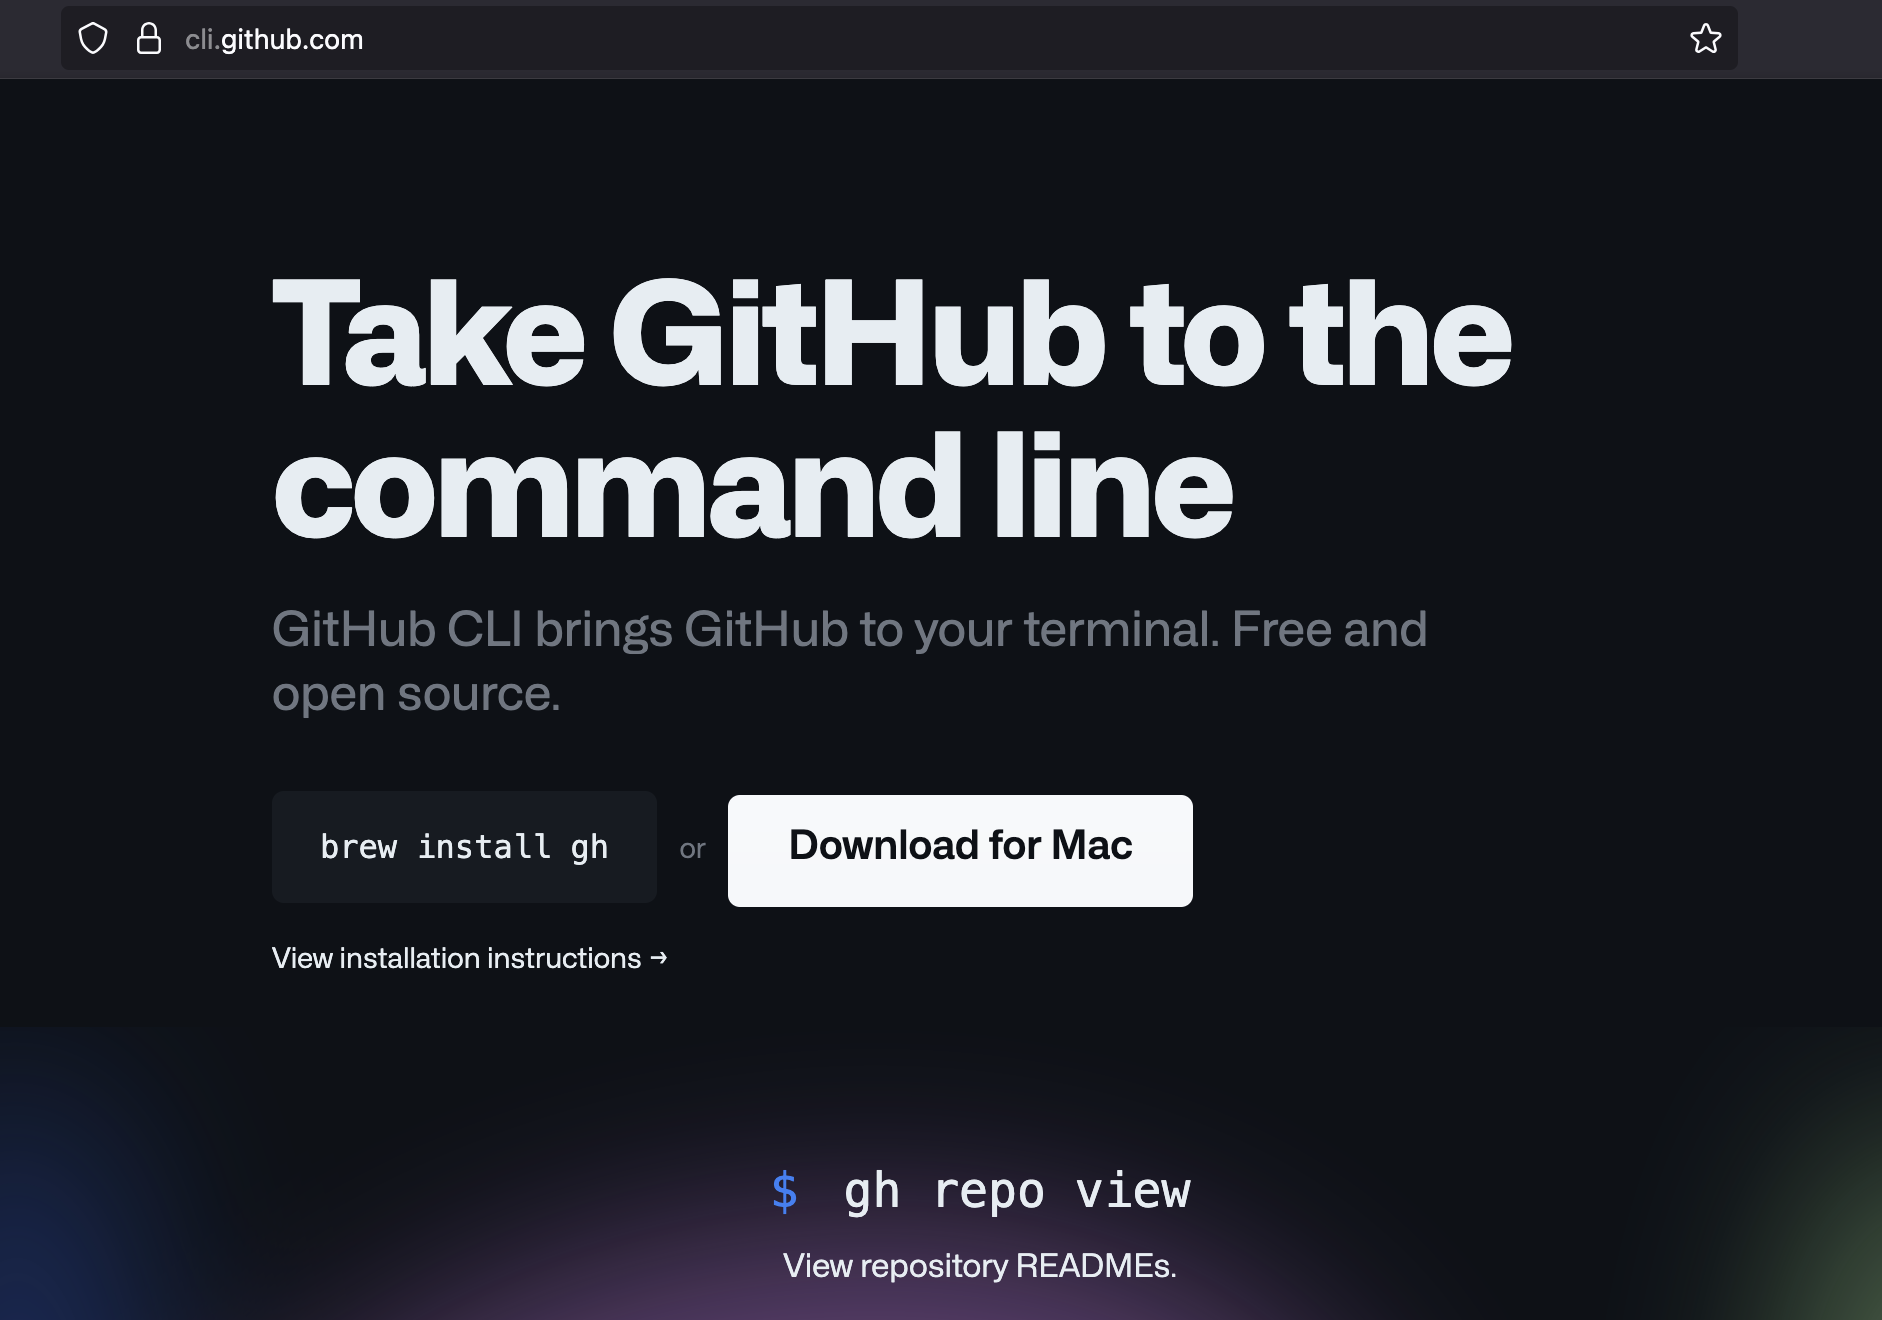
  • GitHub CLI (gh) is the official command-line tool for GitHub
  • It does from the terminal what you would otherwise do in a browser: repositories, issues, pull requests
  • Do not type the WSL command below. Copy it from https://cli.github.com/

macOS (using Homebrew):

# /bin/bash -c "$(curl -fsSL https://raw.githubusercontent.com/Homebrew/install/HEAD/install.sh)"
brew install gh

WSL/Ubuntu:

# Install
(type -p wget >/dev/null || (sudo apt update && sudo apt install wget -y)) \
    && sudo mkdir -p -m 755 /etc/apt/keyrings \
    && out=$(mktemp) && wget -nv -O$out https://cli.github.com/packages/githubcli-archive-keyring.gpg \
    && cat $out | sudo tee /etc/apt/keyrings/githubcli-archive-keyring.gpg > /dev/null \
    && sudo chmod go+r /etc/apt/keyrings/githubcli-archive-keyring.gpg \
    && sudo mkdir -p -m 755 /etc/apt/sources.list.d \
    && echo "deb [arch=$(dpkg --print-architecture) signed-by=/etc/apt/keyrings/githubcli-archive-keyring.gpg] https://cli.github.com/packages stable main" | sudo tee /etc/apt/sources.list.d/github-cli.list > /dev/null \
    && sudo apt update \
    && sudo apt install gh -y

# Update (if already installed)
sudo apt update && sudo apt install gh -y

Verify installation:

gh --version

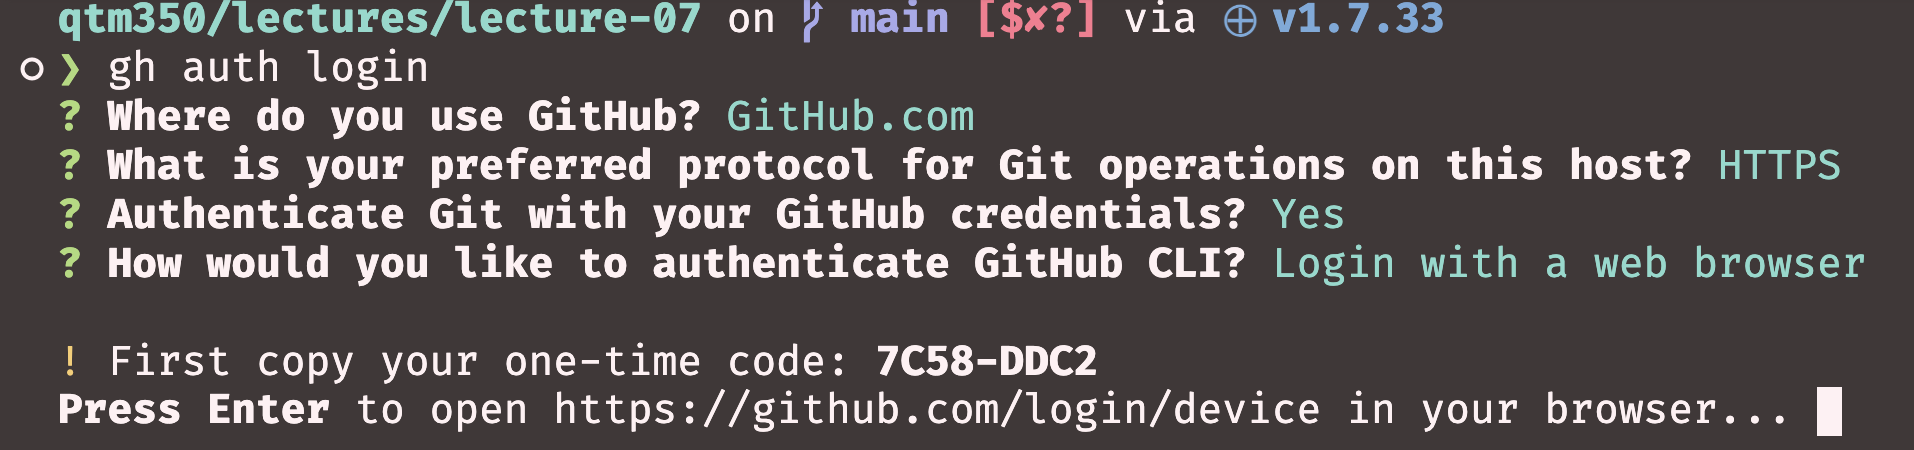
How to connect your terminal to GitHub
Authenticate with GitHub:

gh auth login
  • Select GitHub.com
  • Choose HTTPS Git operations
  • Choose Y to authenticate with a web browser
  • Choose Login with a web browser
  • Press Enter to open the link in your browser and copy the one-time code

  • And you’re all set to use GitHub CLI! 🎉

Working with repositories, pull requests, and issues

Repository operations:

# List your repositories
gh repo list

# Clone a repository
gh repo clone username/repo-name

# Create a new repository
gh repo create 

# View repository details
gh repo view --web

# Fork a repository
gh repo fork

# Star/unstar a repository
gh repo star

# Archive/unarchive a repository
gh repo archive

Pull requests and issues:

# Create a new pull request
gh pr create --title "My PR" --body "Description of my PR"

# List pull requests
gh pr list

# View pull request details
gh pr view 123 --web

# Create a new issue
gh issue create --title "My Issue" --body "Description of my issue"

# List issues
gh issue list

# View issue details
gh issue view 456 --web

GitHub CLI - Practical Examples 💡

Real-world GitHub CLI usage

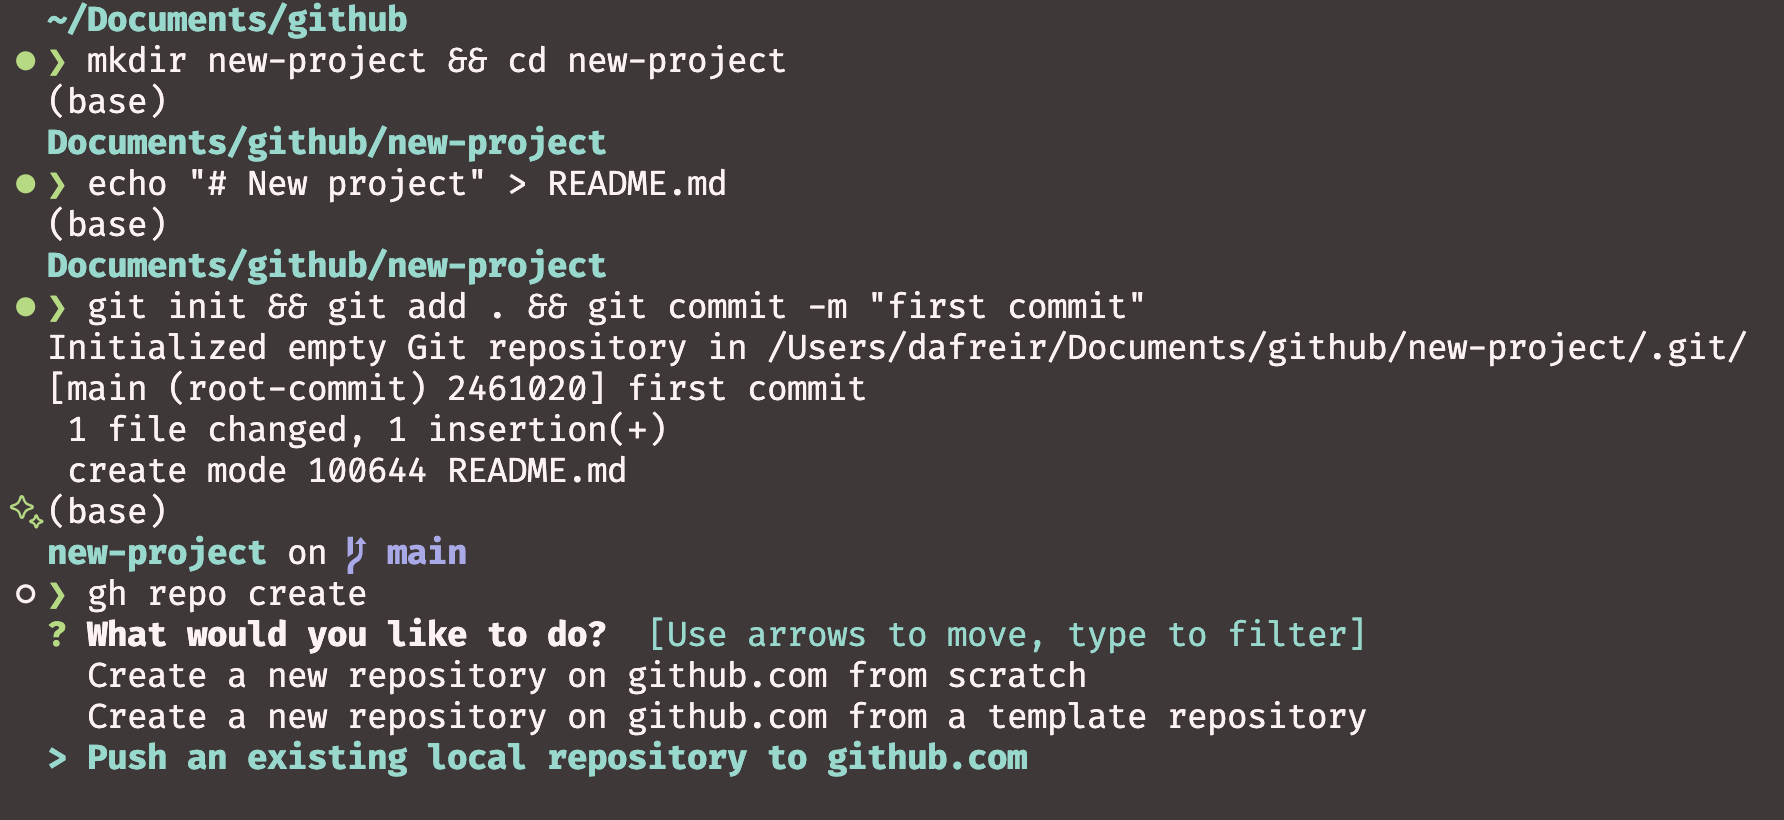
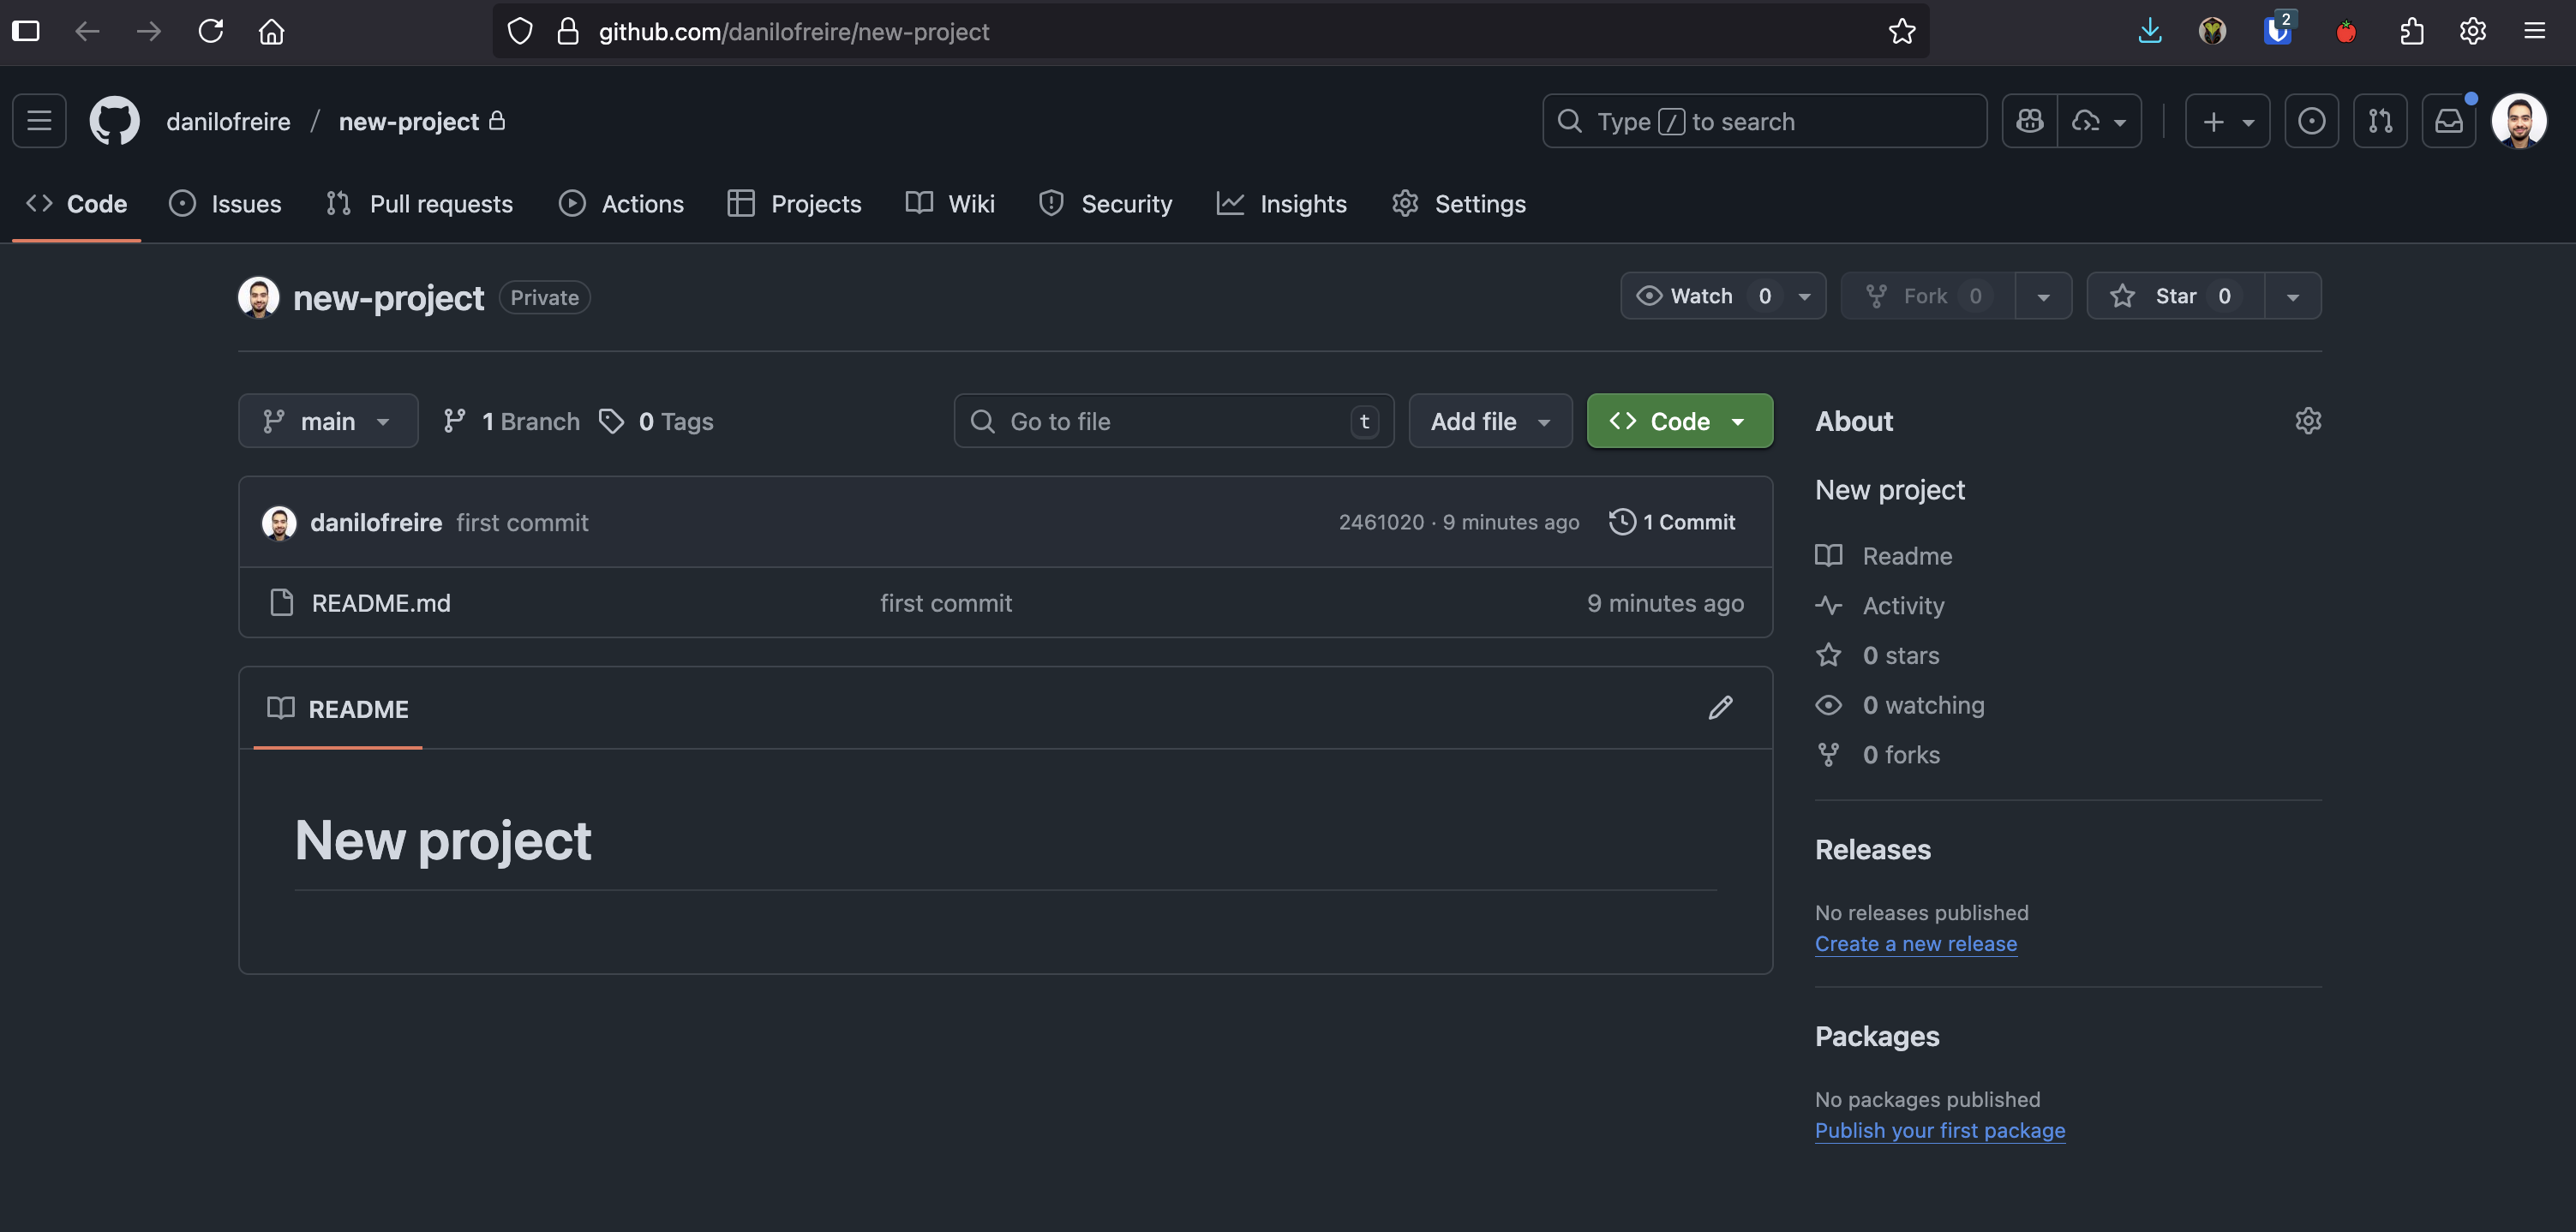
mkdir new-project && cd new-project
echo "# New project" > README.md
git init && git add . && git commit -m "first commit"

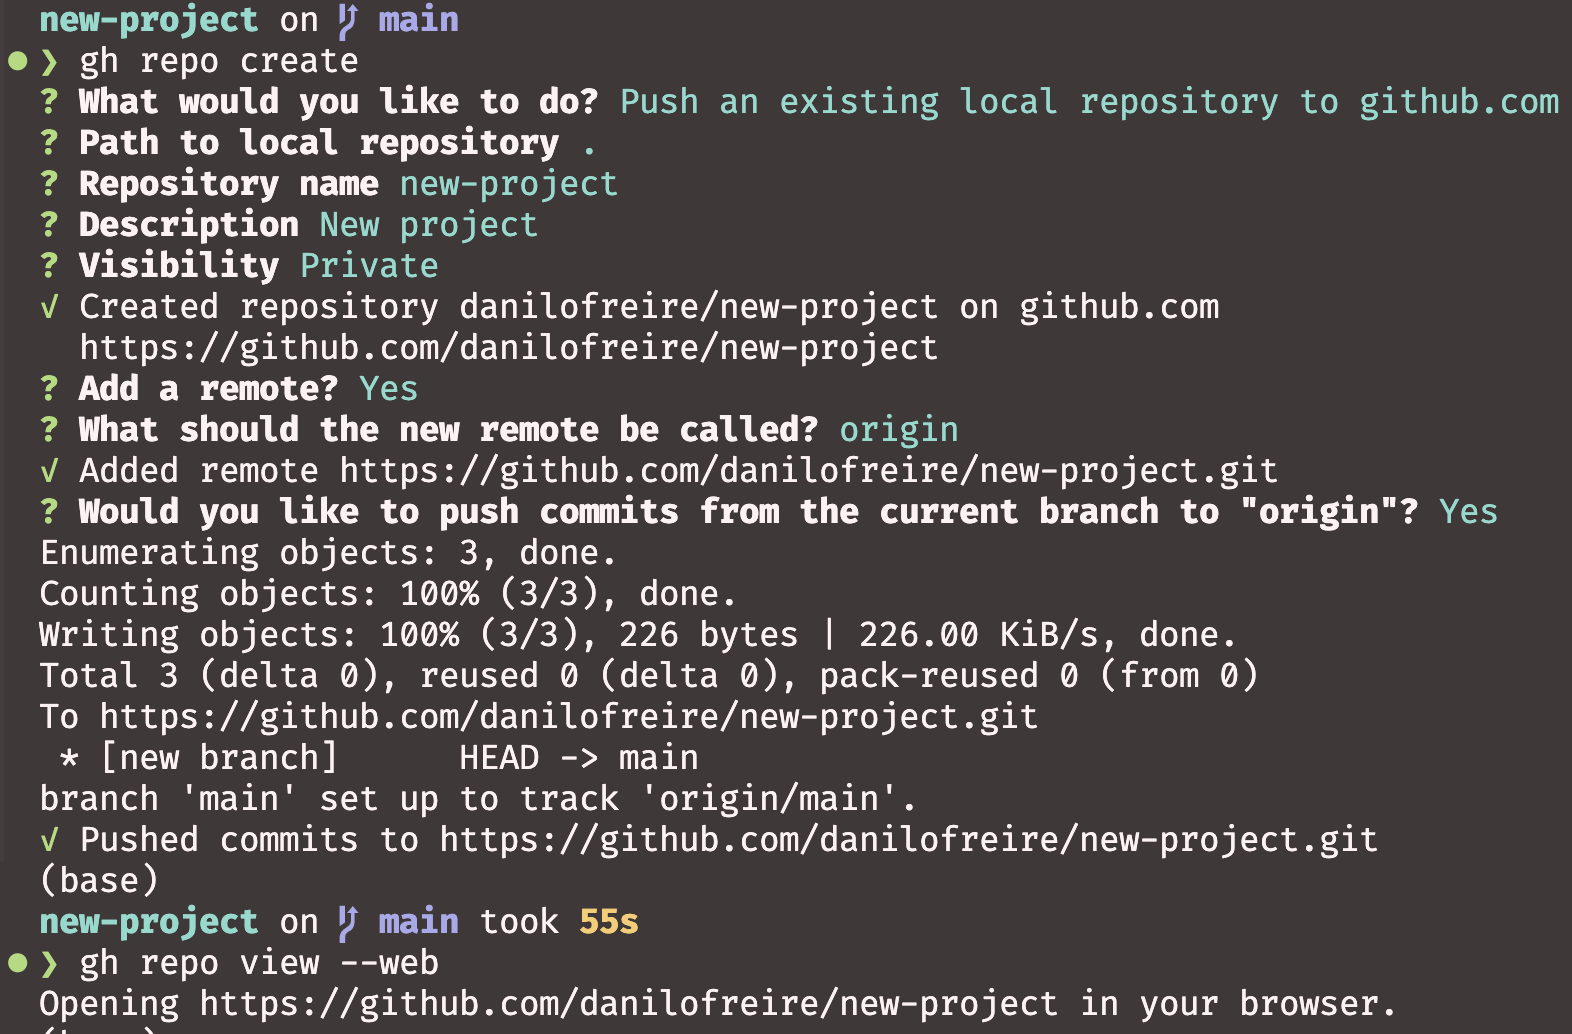
gh repo create
# Follow the prompts
gh repo view --web

Goodbye, GitHub Desktop! 👋

Practice Time! ⏱️

Git practice quiz

Set up the repository

  1. Create a git-practice directory and initialise it
  2. Add a README.md containing # Git Practice Repository
  3. Create src/main.py, empty
  4. Commit everything: “Initial commit with README and main.py”

Work on a branch

  1. Create and switch to a branch called hotfix
  1. In src, use brace expansion to create utils.js, utils.css, and utils.html in one command
  2. Add a .gitignore containing temp/, then commit: “Add hotfix files and gitignore”
  3. Rename src/main.py to src/app.py
  4. Commit: “Complete hotfix development”

Bring it back

  1. Switch back to your default branch, merge hotfix, and show the history in compact form

Check your work with git log --oneline and git branch

And that’s a wrap! 🎉

Appendix: Quiz answers

Solutions to practice quiz

Here are the answers to the practice quiz. Try to complete the quiz first before checking these answers!

  1. mkdir git-practice && cd git-practice && git init
  2. echo "# Git Practice Repository" > README.md
  3. mkdir src && touch src/main.py
  4. git add . && git commit -m "Initial commit with README and main.py"
  5. git checkout -b hotfix
  6. touch src/utils.{js,css,html}
  7. echo "temp/" > .gitignore && git add . && git commit -m "Add hotfix files and gitignore"
  8. mv src/main.py src/app.py
    • git mv src/main.py src/app.py does the same and stages it in one step
  9. git add . && git commit -m "Complete hotfix development"
  10. git checkout main && git merge hotfix && git log --oneline
    • If git init gave you a branch called master, use that name instead. Check with git branch

Additional verification commands:

  • Check commit history: git log --oneline
  • View file structure: ls -la
  • Check branch status: git branch
  • View .gitignore contents: cat .gitignore